1.0
 CueSync Manual
The visual conductor for composers. This guide explains how to create a project, edit the cue sequence, add visual markers to MIDI, and play/export the result.
Welcome to CueSync Documentation
Welcome to CueSync, the visual conductor for composers. This manual provides clear, practical instructions to create a project, edit the cue sequence, add visual markers to MIDI files, and play or export the final video.
Quick Concept
CueSync reads your MIDI files and generates a visual layer (streamers, punches, counters, titles, etc.) synchronized with video and a low-latency clicktrack. It is suitable for rehearsals, scoring sessions and for producing a final video with burned-in visual marks ideal for live performances.
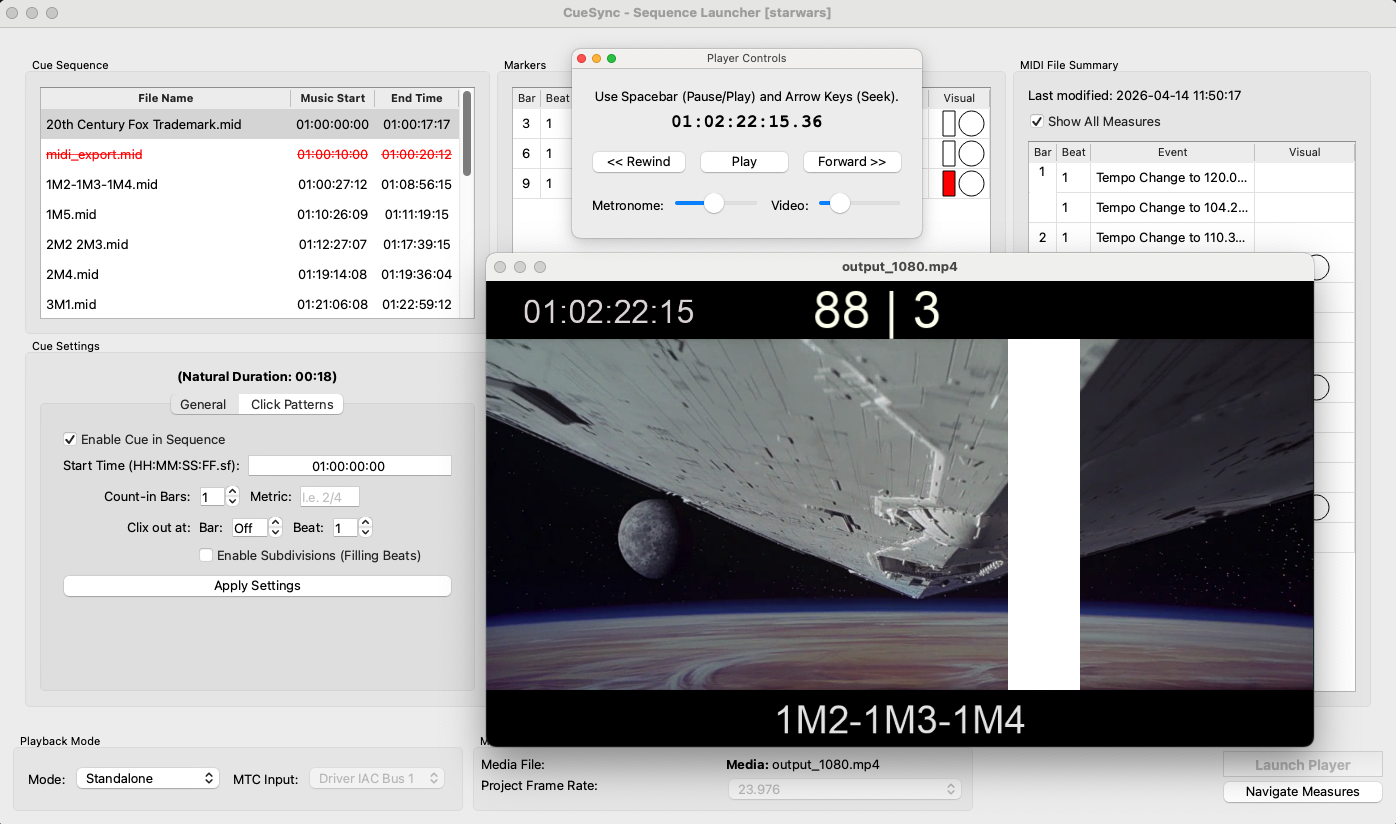
Prepare a Project
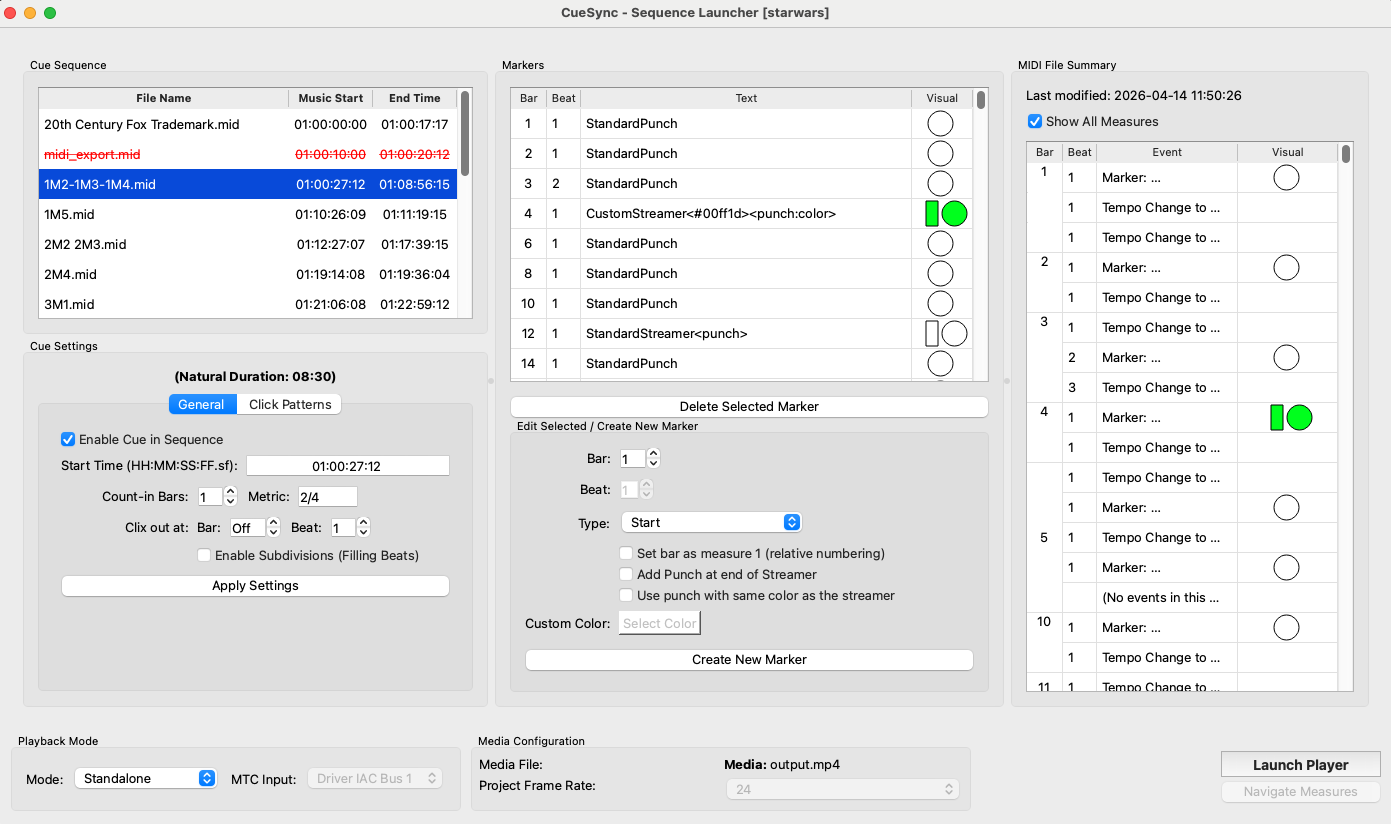
- Organize a folder containing all
.midfiles for the sequence and optionally an existingcues.json(cues.jsonis a file containing project-related information such as style, cue order and timings ). This file is generated automatically when selecting a MIDI directory, so don't worry about it; however, remember that if you share the project this generated file must always be included in the directory you share. - Open CueSync. Use the menu bar to configure the project:
- File → Select Project Directory: choose the folder with the MIDIs.
- File → Select Media File: load a reference video. If none is selected, a black background will be used.
- File → Clear Media: remove the currently selected media file.
- File → Export Video: render the sequence to a video file.
- Settings → Project Settings: open the preferences dialog for animation, style and audio configuration.
- In the bottom panel:
- Playback Mode (left): choose between Standalone (CueSync controls time) or DAW Sync (MTC) (CueSync listens to MIDI Time Code). Select the MTC input port if using DAW Sync.
- Media Configuration (center): displays the selected media file and allows you to set the Project Frame Rate (FPS) when no video is loaded. Match this to your DAW's SMPTE rate.
- Action Buttons (right): Launch Player to open the display and control windows, Navigate Measures (available when player is running in Standalone mode), and Show Mode — a toggle that, when active before pressing Launch, also opens a clean audience window in parallel (see Show Mode).
- Finally, click Launch Player to open the display and control windows.
Sequence Editor
The editor has three panels: cue list (left), marker editor (center) and visual summary (right).
3.1 Cue List
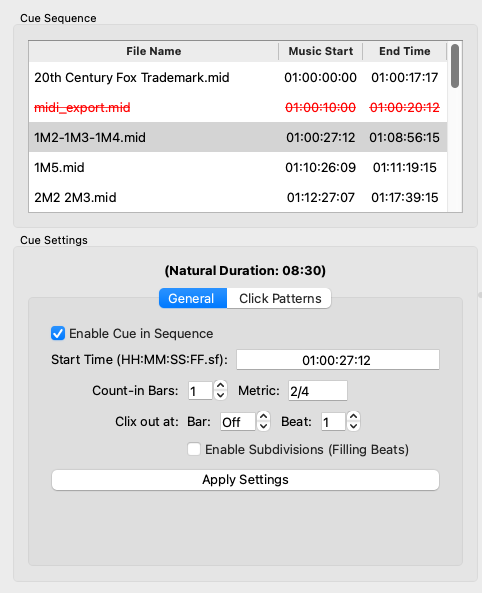
- Shows the project's MIDI files, their SMPTE start time and computed end time.
- Enable Cue in Sequence: toggle to mute/ignore a cue without deleting it.
- Start Time: set the exact timecode (HH:MM:SS:FF) where the music begins.
- General Settings:
- Count-in Bars: number of bars for the countdown.
- Metric: meter for the count-in (e.g. 4/4, 3/8). If empty, it uses the MIDI's first measure.
- Enable Subdivisions: if enabled, the clicktrack fills weaker pulses according to the defined click pattern.
- Clix Out: optionally silence the clicktrack from a specified bar and beat (useful to mute metronome for final passages or recording takes).
Click Pattern Editor
For complex meters (e.g. 7/8 split as 3+2+2), CueSync offers a visual designer to shape clicktrack accents.
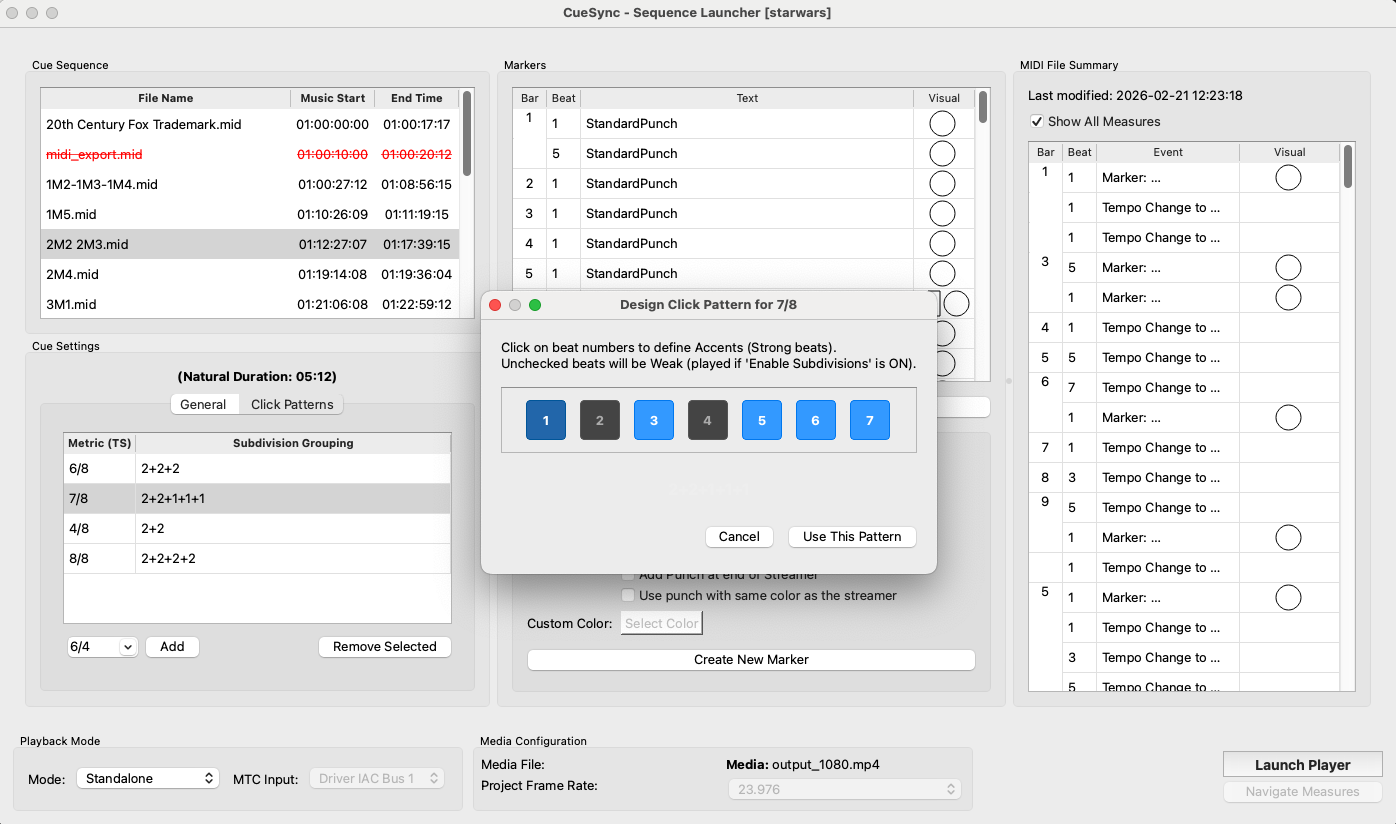
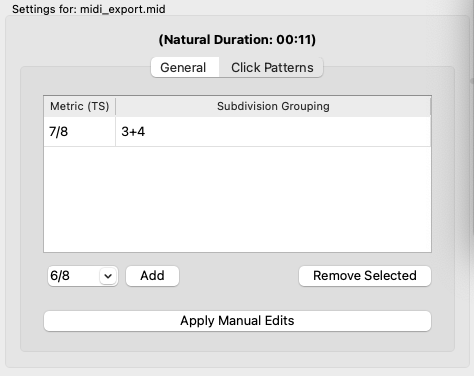
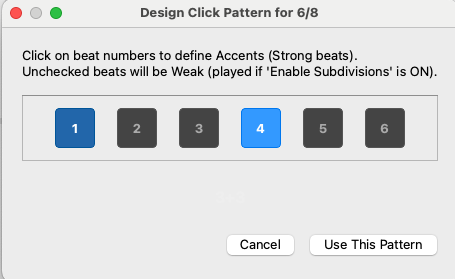
- In the Click Patterns tab, click Add or double-click a meter.
- A visual editor opens where you can toggle accented pulses (grouping).
- This ensures audio clicks and visual measures match musical intent.
3.2 Marker Editor
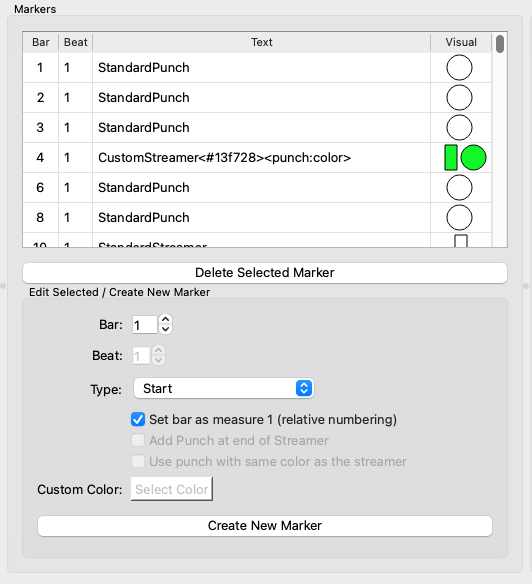
- Select a cue to view the table of musical markers (bar, beat, text).
- To create a marker:
- Choose bar and beat.
- Select type (Start, End, Streamer, Punch, Custom, Meter Change).
- Adjust options:
- Add Punch: add a synchronization circle at the streamer's end.
- Same Color: force the punch to match the streamer bar color.
- Set bar as measure 1: (Start markers only) reset visual bar numbering to 1 at this point.
- Click Create New Marker.
- To edit: select a row and change fields — updates apply in real time.
- To delete: select a row and click Delete Selected Marker.
Supported marker types
| Type | Description / Use |
|---|---|
Start | Marks the music start. Can reset bar counting (relative numbering). |
End | Marks the end. Generates a red streamer. |
Standard Streamer | Standard bar (white by default, configurable) for sync points. |
Standard Punch | Sync circle (flash) at a specific point. |
Custom Color | Streamer or Punch with a specific color chosen from the palette. |
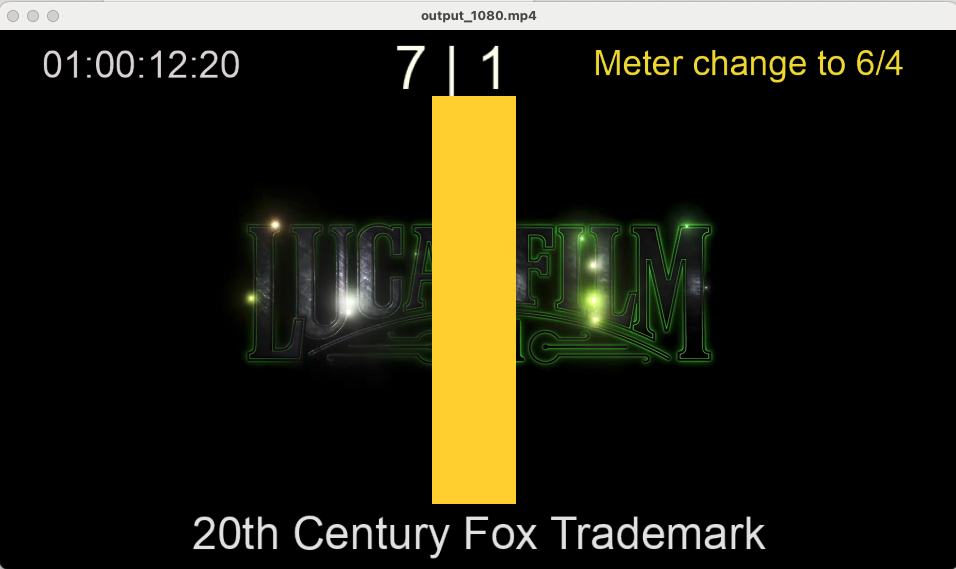
Meter Change | Visual notice of meter change. Shows "X/X" with the new meter. Position and style configurable in Preferences. |
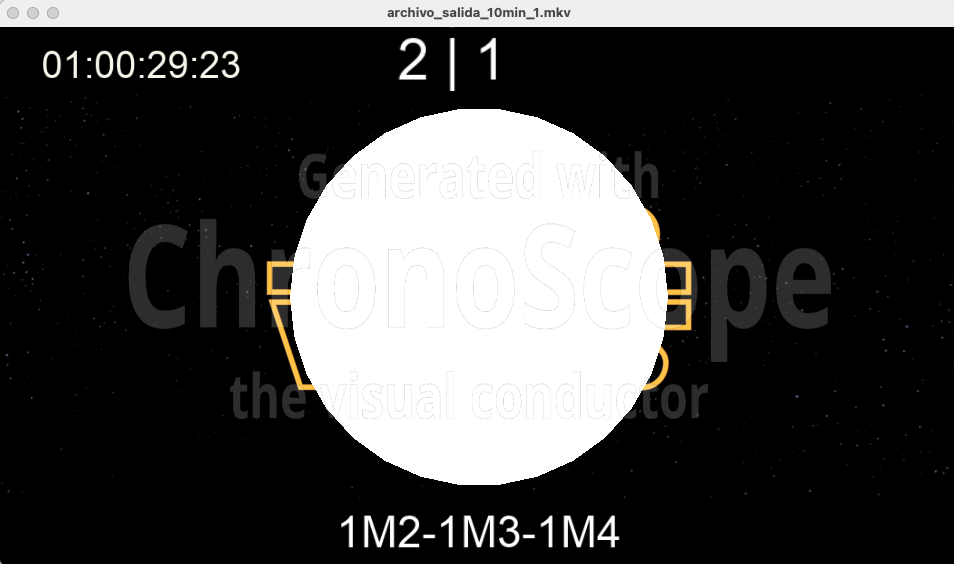
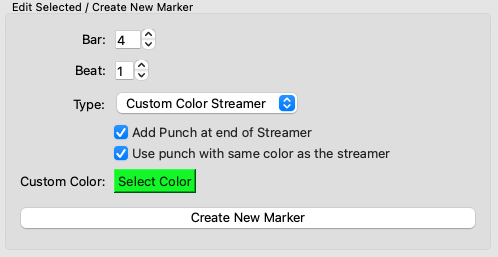
- Markers are primarily saved in MIDIs and secondary in
markers.json(automatically generated, you should not edit this file directly) for security. - The editor prevents duplicates: you can't create two markers on the same bar and beat.
- Set bar as measure 1 allows relative renumbering of measures.
3.3 Visual Summary
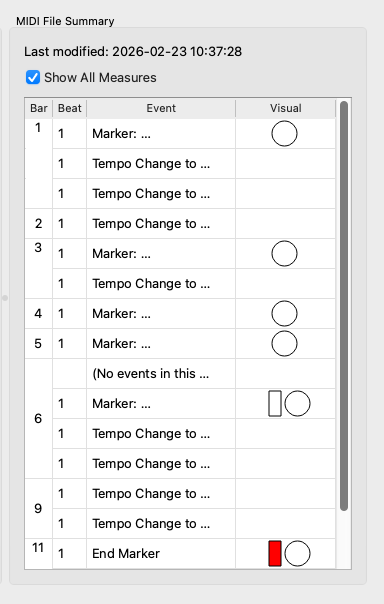
- Shows a per-bar summary with important events (tempo, meter changes, markers).
- The summary uses the ovarlays colors and styles defined in Marker Editor and Preferences.
Preferences
Access Preferences from the Launcher. Settings are stored in the project's cues.json.
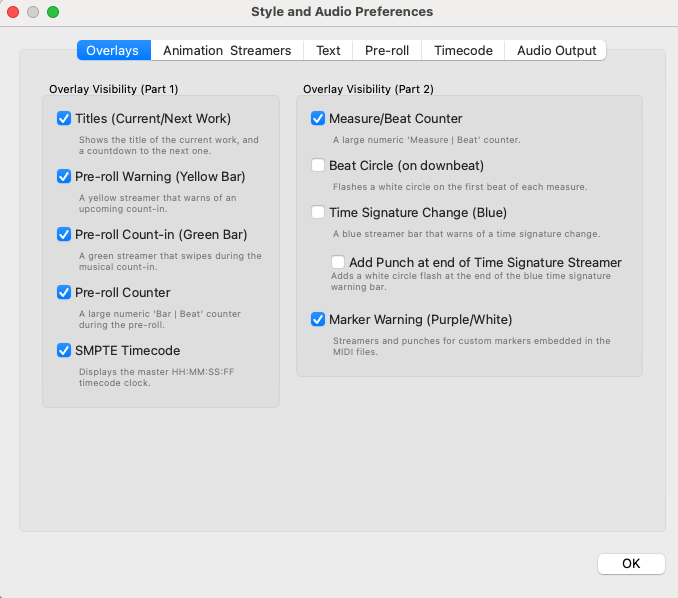
- Overlays: enable or disable whole visual layers (Titles, SMPTE, Counters, Streamers, etc.).
- Animation & Streamers: configure wipe duration, bar dimensions and streamer colors for meter changes.
- Text: adjust position, scale and color for texts (work title, bar counters).
- Pre-roll:
- Yellow/Green Bar: enable visual countdown bars.
- Counter & Text: position and scale of countdown text and negative-bar counter.
- Punch on Downbeat Only: if checked, the pre-roll flash only blinks on the strong beat (1).
- Timecode:
- Visual style of the SMPTE clock.
- Timecode Origin Mapping: set a SMPTE origin or a simple seconds offset so the timecode CueSync displays matches your DAW or recorder. This ensures overlays, counters and exported videos use the same SMPTE reference as your session.
- If your cues starts at 01:00:00:00, enter that as the origin so displayed timecodes match.
- When sharing a project, include the same mapping so collaborators see identical timecodes.
- Audio Output:
- Select the physical audio output device (clicktrack + Video Audio).
Audio clicktrack
- Sounds: uses pure sine tones.
- Strong (High): marks downbeat (1).
- Weak (Low): marks other beats.
- Subdivisions: softer tone for slow tempos.
- Pre-roll: distinct tones to signal the countdown.
- Calibration: automatic latency adjustment so audible clicks and visual flashes align perceptually.
Visual Guides & Audio Engine
Pre-roll System (Visual Wipes)
- What: a short visual + audible countdown before the music starts (yellow warning, green action, optional numeric counter).
- When: use it for rehearsals, recording takes or when musicians need a clear cue before playback.
- How to enable: turn on Pre-roll in Preferences or in the Launcher when preparing a cue.
- Quick setup:
- Count-in Bars — set 1–4 bars depending on how much prep time you need.
- Yellow/Green Bar — yellow warns early, green finishes exactly at the first music frame.
- Counter — shows "bar | beat into X/X"; position and size in Preferences.
- Punch on Downbeat Only — enable to avoid repeated flashes when you only want the strong beat highlighted.
- Simple tips: prefer 2 bars for studio takes, use 4 bars for live ensembles; disable pre-roll for silent exports.
Time Signature & Tempo Overlay
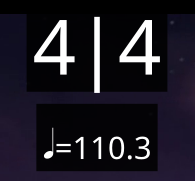
A small musical readout kept on screen at all times, showing the current meter and tempo of the piece as it plays.
- What you see: the current time signature (e.g. 4/4, 7/8, 6/8) alongside a note-value equation such as ♩=120 or, in compound meters, ♩.=80.
- Compound meters handled correctly: in 6/8, 9/8 and 12/8 the tempo is displayed against the dotted-quarter pulse (♩.), not the raw eighth-note value, so it matches how conductors actually count the piece.
- Live updates: the overlay reacts instantly to meter and tempo changes coming from the MIDI, so mid-cue accelerandos or shifts to a new time signature are always visible.
- Where it appears: on the video canvas, position and size configurable in Preferences → Overlays.
The clicktrack is the audible metronome used during rehearsal and playback. It mixes with video audio or runs by itself.
- Turn it on/off: enable in Preferences or from the Controller for rehearsals; disable for silent takes or final exports.
- Adjust volumes: set metronome and video audio levels independently from the Controller (temporary playback overrides are available).
- Subdivisions: enable to hear softer subdivision clicks for complex meters; leave off for a simple steady beat.
- Clix Out: specify a bar+beat to stop the click automatically (useful to mute the click during final bars or when recording).
- Share settings: save metronome preferences with the project so others hear the same behaviour.
Player & Controller
Clicking Launch Player opens two windows: the video display and the control panel.
Video Window (Player)
A fullscreen or windowed display that shows the video with overlaid graphics (streamers, punches, counters, titles, etc.), synchronized to the audio clicktrack and current playback time.
- Resize freely: window can be resized; overlays scale automatically.
- Always on top: player window stays above other applications for rehearsals.
Control Window (Controller)
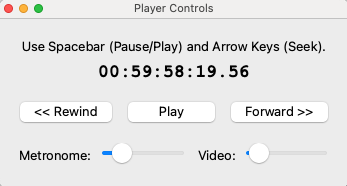
- Transport: Play, Pause and scrubbing bar for timeline navigation.
- Volumes:
- Clicktrack Volume: the metronome's audio level.
- Video Audio Volume: the original video's audio level.
- Current Timecode: displays SMPTE time or seconds elapsed.
- MTC Mode Indicator: in DAW Sync (MTC) mode, shows "Waiting for MTC" until external timecode arrives; transport buttons are disabled.
Show Mode (Audience Window)
Show Mode opens a second, clean playback window intended for the audience or projector, while the director keeps the annotated one. Toggle the Show Mode button in the Launcher before pressing Launch Player.
What appears in each window
- Director window (the usual one): video with all overlays — streamers, punches, counters, pre-roll, time signature & tempo readout — plus the audible metronome.
- Audience window (only when Show Mode is on): the raw video, nothing else. No overlays, no HUD, no metronome, no audio duplication.
How it stays in sync
- Both windows are driven by the same internal clock and the same video decoder instance, so they are frame-locked automatically — you don't need to align them manually.
- Play, pause and seek from the Controller apply to both windows at once. MTC nudges affect both too.
Typical setup
- Connect a second display (projector, TV, extended desktop).
- In the Launcher, enable Show Mode, then click Launch Player.
- Drag the audience window to the second display and set it to fullscreen.
- Keep the director window on your primary screen with the Controller alongside.
Measure Navigator
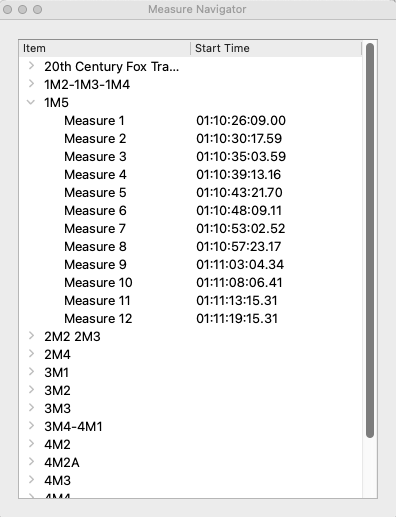
In Standalone mode (not DAW Sync), the Navigate Measures button opens a hierarchical list of all works and measures in the sequence. This floating window allows you to jump instantly to any measure during playback without pausing.
Features
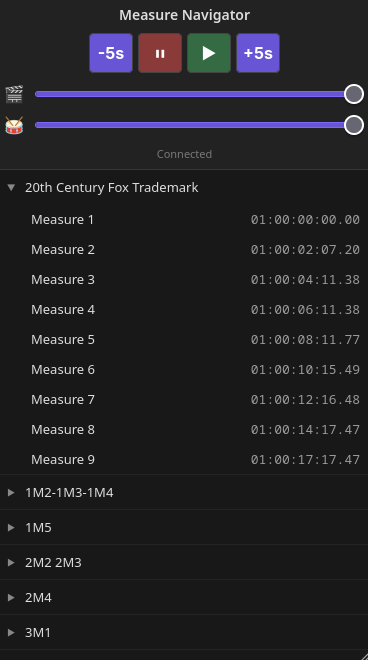
- Hierarchical View: displays all works (cues) organized as a tree, with each work expanded to show its measures.
- Timecode Display: each measure shows its start timecode, accounting for any timecode origin mapping configured in Preferences.
- Instant Seek: double-click any measure to jump to that point in the timeline instantly without pausing playback.
- Real-time Updates: if you edit start times in the Sequence Editor while the player is running, the navigator reflects the changes automatically.
- Floating Window: stays on top of other windows but does not steal keyboard focus, allowing you to interact with both the navigator and the player controller simultaneously.
How to Use
- Start playback in Standalone mode.
- Click Navigate Measures in the Launcher window (button enabled only during playback in Standalone mode).
- A floating tree view window appears listing all works and their measures with timecodes.
- To jump to a specific measure:
- Locate the work (cue) in the tree.
- Find the measure you want to jump to.
- Double-click the measure row to instantly seek to that point.
- The navigator remains open and usable throughout playback.
Limitations & Notes
- Standalone Mode Only: the navigator is disabled in DAW Sync (MTC) mode because CueSync acts as a slave to the DAW's timeline.
- Playback Required: the button is only enabled while the player is running in Standalone mode.
- Empty Cues: cues with no measures (empty MIDI files) show a placeholder "(No measures)" entry with the cue's start time.
- Timecode Origin Mapping: the navigator respects the Timecode Origin mapping from Preferences, so displayed timecodes always match what the controller shows.
Web Navigator (Mobile / Remote Control)
Inside the Measure Navigator window there is a Web Navigator button. Pressing it starts a lightweight local server that exposes the same navigator as a webpage. Any phone, tablet or laptop on the same Wi-Fi network can open the URL and control playback from across the room — no app to install, nothing to pair.
How to use it
- Start playback (Standalone mode) and open Navigate Measures.
- Click Web Navigator. A URL of the form
http://<your-computer-ip>:<port>is shown. - Open that URL in the browser of any device on the same Wi-Fi / LAN — phone, tablet, laptop, control-surface iPad.
- Jump to any measure, pause/resume, or reset from the remote page. Changes take effect on CueSync immediately.
What it's for
- Conductors and directors who want to control cues from the podium without walking back to the laptop.
- Live sessions where the operator is in the booth and the musical director needs remote transport.
- Silent rehearsals: skip between rehearsal marks from your phone without touching the keyboard.
Notes & caveats
- Same network required: the phone must be on the same Wi-Fi / LAN as the computer running CueSync. This is a local-network feature — nothing goes through the internet.
- Firewall: the first time you launch it, macOS may ask whether to allow incoming connections. Say yes.
- Standalone mode: as with the desktop Measure Navigator, remote seek is only available in Standalone mode (in DAW Sync, timing comes from the DAW).
Export Video (Render)
Produce a final video with all visual marks burned in, ideal for sharing with directors or musicians without the app.
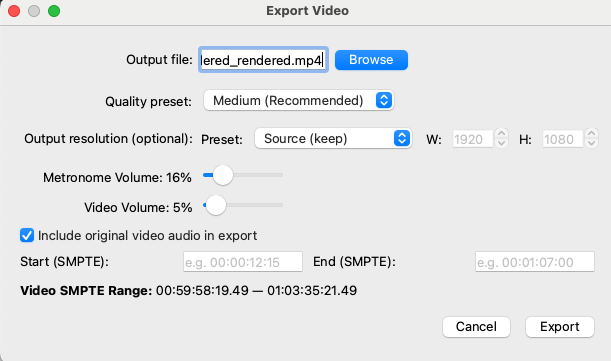
- Output File: destination file (.mp4).
- Presets: quality (High, Medium, Low) and resolution (1080p, 4K, Custom).
- Volume Overrides: fixed levels for render independent of controller faders.
- Partial Render: export a fragment by specifying Start SMPTE and End SMPTE.
- Include Original Audio: choose to mix the video's original audio into the output.
Share Project
To share a project, provide the full project directory that contains the MIDI files and the project's cue data file. The recipient must receive the entire directory so CueSync can open the project with the same cues and timings.
- Compress the project directory (zip) or share it via a network drive or cloud link.
- Ensure the directory includes the cue data file and all
.midfiles andcues.jsonused by the sequence. - On the receiving machine, open CueSync and select the shared project directory.
Quick Start
- 01Organize your MIDI files and open CueSync.
- 02Select the project folder and optional video file.
- 03Edit cue sequence and markers in the editor.
- 04Adjust preferences to taste.
- 05Play and export your project.